Knowing how to perform CPR on children can be a lifesaver. This step-by-step guide aims to equip you with the essential skills and knowledge to act confidently in an emergency. Read Interesting article: A Parent’s Guide to CPR for Children: Stay Prepared
Understanding CPR for Children
What is CPR?
Cardiopulmonary resuscitation, or CPR, is a lifesaving technique used when someone’s heart stops beating or they stop breathing. I remember the first time I learned about CPR; it was eye-opening to realize how critical this skill can be in emergencies. For children, the technique may differ slightly from adults due to their smaller size and unique anatomical features.
Importance of CPR for Children
Performing CPR on children is crucial because they are more vulnerable to sudden cardiac arrest and respiratory problems. I’ve read numerous stories about parents and caregivers who had to act quickly. Those who knew CPR saved lives. The chances of survival can significantly increase if CPR is initiated promptly. Just knowing that a few minutes can make a difference is a great motivator to learn this skill. Read Interesting article: CPR for Kids: Life-Saving Skills Every Parent Needs
Differences Between Adult and Child CPR
When it comes to performing CPR, there are key differences between adults and children. I learned that for children, you should use one hand for chest compressions instead of two, and the depth and rate of compressions are also adjusted according to their smaller bodies. Additionally, the rescue breaths are given more gently to avoid harming their delicate lungs. Understanding these differences can prepare us to respond effectively in situations involving children.
When to Perform CPR on Children
Recognizing Cardiac Arrest in Children
Recognizing when a child needs CPR is critical. I recall a time when my niece fell unconscious while playing. It was terrifying, but I knew I had to act quickly. Signs of cardiac arrest include unresponsiveness and lack of breathing or abnormal breathing. If a child isn’t responding to voice or touch, it’s essential to act fast. I often remind myself that taking immediate action can save a life.
Signs of Respiratory Distress
Respiratory distress can be subtle at first but can escalate quickly. I’ve noticed that children may struggle to breathe, show signs of panic, or have a bluish tint to their skin, especially around the lips or face. When I’ve encountered situations where children were in distress, their inability to speak or their wheezing breaths were clear indicators that something was wrong. Recognizing these signs early can be the difference between life and death.
Situations Requiring CPR
There are various scenarios where CPR might be necessary for children. Drownings, choking incidents, or severe allergic reactions often lead to a need for resuscitation. I remember hearing about a neighbor’s child who choked on food. Fortunately, someone nearby knew CPR and helped until emergency services arrived. These cases remind me of the importance of being prepared and having the knowledge to act in these critical moments.
Preparing to Administer CPR
Assessing the Scene for Safety
Before jumping into action, it’s vital to ensure that the scene is safe. I always take a quick look around to identify any potential hazards. Is there traffic nearby? Are there other children around who might also be in danger? Making sure we can safely approach the child is the first step to effectively perform CPR.
Calling for Emergency Help
Once the scene is safe, calling for emergency assistance is essential. I’ve learned that having someone else make the call while I begin CPR can be very effective. It’s important to be clear and concise when explaining the situation to dispatch, including the child’s age and condition. I find that staying calm helps convey the urgency of the situation.
Gathering Necessary Equipment
While many situations may not require special equipment, having a few items on hand can be helpful. I often keep a first aid kit nearby, and if available, an Automated External Defibrillator (AED) can be a lifesaver. Knowing how to use these tools can enhance our ability to provide aid effectively. In an emergency, being prepared can ease our minds and allow us to focus on the child.
Step-by-Step Guide to Performing CPR on Children
Step 1: Check Responsiveness
When I’m faced with a situation where a child might need CPR, the very first thing I do is check their responsiveness. I gently shake the child’s shoulders while calling out their name or saying, “Are you okay?” This step is crucial because it helps me determine if the child is unconscious and in need of immediate help. If there’s no response, I take a deep breath and prepare to move on to the next step, knowing that time is of the essence.
Step 2: Call for Help
If the child isn’t responsive, I immediately call for help. If I’m alone, I make sure to call emergency services myself before starting CPR. In my experience, I find it helpful to use my phone’s speaker function so I can keep my hands free. I clearly state the situation, providing details like the child’s age, the circumstances, and their condition. If I have someone else with me, I ask them to make the call while I begin CPR. This teamwork can be incredibly effective in emergencies.
Step 3: Open the Airway
With the call for help made, the next step is to open the airway. I usually tilt the child’s head back slightly and lift the chin. This position helps clear any obstruction, allowing air to flow more easily. I remember feeling a sense of urgency during my training, realizing how critical this step is. Even a small blockage can make a huge difference when it comes to breathing.
Step 4: Check for Breathing
After opening the airway, I take a moment to check for breathing. I lean down to listen and feel for breaths, looking for any signs of normal breathing. It’s a tense moment; I hold my breath as I listen. If the child is not breathing or only gasping, I know it’s time to proceed with chest compressions. I’ve learned that this is when staying calm is vital, as panicking won’t help the situation.
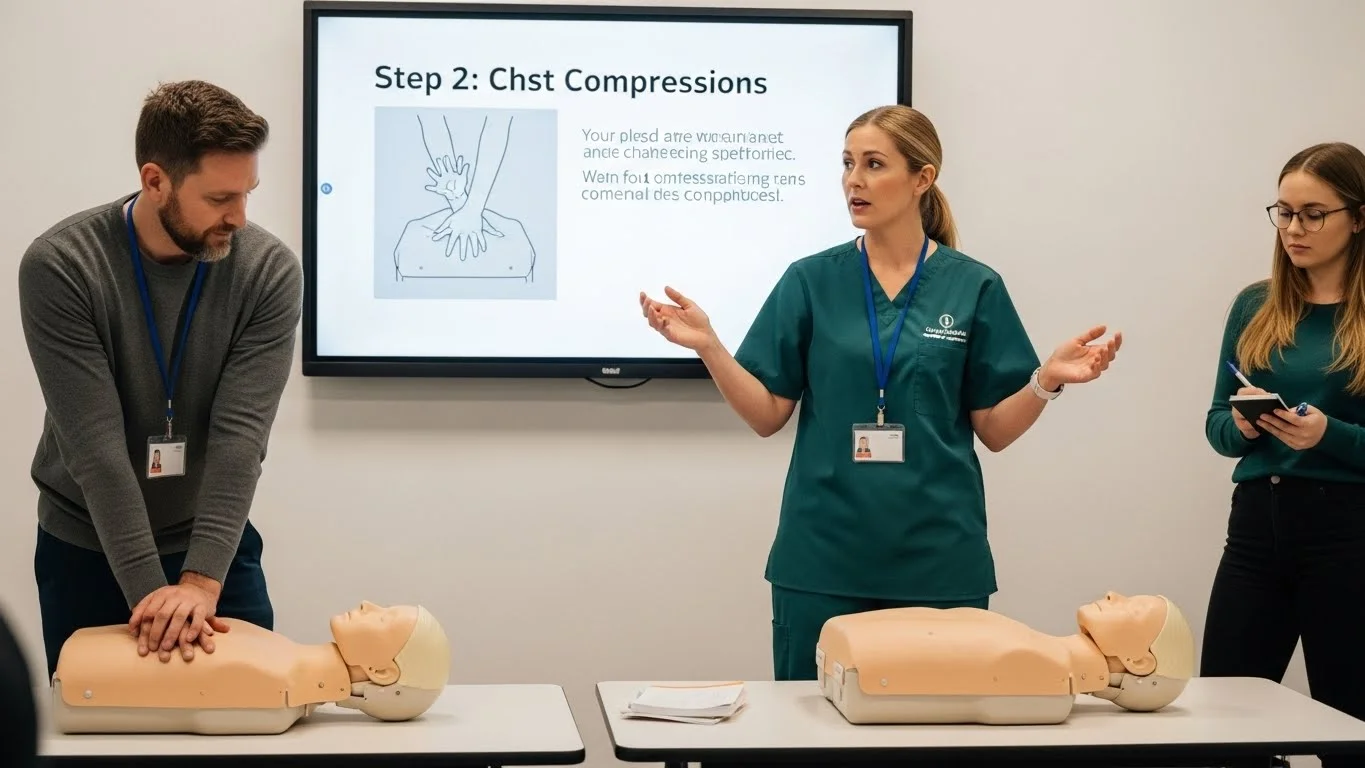
Step 5: Provide Chest Compressions
Now comes one of the most critical aspects: chest compressions. I position my hands on the center of the child’s chest, just below the nipple line. I push down with enough force to compress the chest, allowing it to fully recoil between compressions. I remember the first time I practiced this—it felt empowering to know I could potentially save a life through this simple action.
Compression Technique for Children
For children, I usually use one hand for compressions, unlike the two hands I’d use for an adult. This technique helps to avoid causing harm while still being effective. I press down hard enough to compress the chest about one-third of its depth, which I’ve learned is crucial for effective blood circulation.
Compression Depth and Rate
The recommended rate for compressions is about 100 to 120 compressions per minute. I often visualize the beat of a song in my head to help keep my rhythm. It’s interesting how music can be a guide in these intense moments. The depth and speed of compressions are essential for maintaining blood flow, and if I keep my focus, I can ensure that I’m doing it right.
Step 6: Provide Rescue Breaths
Once I’ve completed 30 compressions, it’s time to provide rescue breaths. I cover the child’s mouth with my own, ensuring a good seal, and give two gentle breaths. I’ve learned to be careful not to over-inflate the lungs; the goal is to make the chest rise, not to force air in aggressively. This part can feel daunting, especially under pressure, but it’s vital for providing oxygen to the child’s body.
How to Give Rescue Breaths
I typically give each rescue breath over one second, watching for the chest to rise. It’s a simple but critical step, and I always remind myself to stay steady. If I’m uncertain about the breaths, I remind myself that performing compressions continuously is also beneficial until help arrives.
Breath Volume and Timing
The volume of each breath is important; I try to keep it just enough to see the chest rise, ensuring not to overdo it. I take a moment between breaths to check if the child is responding or showing any signs of improvement. If they do, that’s a sign to keep focusing on them until help arrives.
Step 7: Continue CPR Until Help Arrives
Continuing CPR is crucial. I commit to performing these cycles of compressions and rescue breaths until emergency services arrive or the child begins to show signs of life. I often find that my adrenaline kicks in, driving me to stay focused and energized during this process. It’s a labor of love, and knowing I’m doing everything I can to help keeps me going. I remind myself that every second counts and staying resilient is essential.
Special Considerations for Infant CPR
Differences in Technique for Infants
When it comes to performing CPR on infants, the techniques differ significantly from those used for older children. I learned that the infant’s size and fragility require a more delicate approach. For instance, when giving chest compressions, I use two fingers instead of my hands, positioning them just below the nipple line. This ensures that I’m applying the right amount of pressure without risking injury. I remember feeling nervous the first time I practiced on a baby mannequin, but it was a great way to build my confidence. Understanding these nuances is essential, as infants are less resilient than older children and adults.
Compression and Breath Ratios for Infants
In my training, I discovered that the compression-to-breath ratio for infants is different too. For infants, the recommended ratio is 30 compressions followed by 2 rescue breaths, just like in child CPR. However, if I’m performing CPR with another person, we switch to a 15:2 ratio, which can be helpful in maintaining a continuous flow of compressions and breaths. It’s fascinating how these small adjustments can have a big impact. I’ve also learned to be gentle with the breaths, making sure they are just enough to see the chest rise. In these high-pressure moments, I try to remind myself to stay calm and focused.
Common Mistakes to Avoid
While learning CPR, I encountered several common pitfalls that I’ve made a mental note to avoid. One mistake is using too much force during compressions. I’ve seen how this can harm an infant, so I always remind myself that I only need to compress the chest about 1.5 inches deep. Another error is forgetting to check for a pulse before starting compressions. It’s vital to ensure that the infant truly needs resuscitation before jumping into action. I also learned that not keeping a clear airway can hinder rescue breaths, which is why I emphasize the importance of properly positioning the head. Avoiding these mistakes can make a significant difference in an emergency situation.
Post-CPR Care
What to Do After CPR is Administered
Once emergency services arrive or the child starts showing signs of life, I focus on remaining calm and composed. It’s important to provide clear information to the responders about what occurred and the actions I took during CPR. I’ve found that having a detailed account ready helps everyone stay on the same page. After administering CPR, I always check the child’s responsiveness and breathing again. If they’re breathing, I position them on their side to keep their airway clear. This small step can be crucial in preventing choking or aspiration.
Communicating with Emergency Services
When emergency services arrive, I’ve learned that clear communication is key. I make sure to inform them about the child’s age, any pre-existing conditions if known, and the timeline of events leading to the emergency. I often feel a rush of adrenaline during this part, but I remind myself to take a deep breath and share the information calmly. The responders rely on this information to provide appropriate care once they take over, and I want to ensure I’m as helpful as possible in those moments.
Monitoring the Child’s Condition
After CPR, monitoring the child’s condition is essential. Even if they appear stable, I know that they might need continued observation until professional help arrives. I keep an eye on their breathing and responsiveness. In my experience, children can have sudden changes in condition, so being vigilant is crucial. I’ve seen cases where the child seemed fine initially but later showed signs of distress. Staying attentive can make all the difference, and I always remind myself that I’m still an important part of their care until they’re in safe hands.
Training and Resources
Where to Get CPR Training
In my journey to become proficient in CPR, I realized that finding the right training programs is vital. I recommend looking for classes offered by reputable organizations like the American Heart Association or the Red Cross. Many local community centers and hospitals also provide CPR training sessions. I signed up for a hands-on workshop, and it was one of the best decisions I made. Being able to practice on mannequins under the guidance of experienced instructors gave me a sense of confidence that I carry with me today. I believe that everyone should have access to this life-saving training. Read Interesting article: Essential CPR Techniques Every Parent Should Know
Recommended CPR Certification Courses
When searching for CPR certification courses, I found that it’s essential to choose one that specifically includes pediatric CPR. I took a course that focused on both child and infant CPR, which I found incredibly valuable. It was reassuring to receive a certificate after completing the training, knowing I had the knowledge and skills to help in an emergency. Some organizations even offer online courses, but I personally prefer in-person training for the hands-on experience it provides. I encourage anyone interested to explore certification options that best fit their learning style and schedule.
Online Resources and Videos for Practice
In addition to formal training, I discovered that there are countless online resources and videos available for CPR practice. Websites like YouTube have instructional videos that demonstrate techniques clearly. I often revisit these videos to reinforce my knowledge, especially before a big family gathering or event where children are present. It’s amazing how accessible this information has become, allowing us to learn at our own pace. I’ve found that practicing with a friend or family member can also help solidify those skills. We all want to be prepared to respond when it matters most.
Legal Considerations and Good Samaritan Laws
Understanding Good Samaritan Laws
One aspect that often comes up when discussing CPR is the legal protection for those who provide assistance in emergencies. I learned about Good Samaritan Laws, which are designed to protect individuals who act in good faith to help others in distress. Knowing that I’m legally protected if I perform CPR has given me peace of mind. Before my training, I used to hesitate about getting involved, fearing I might make things worse or face legal repercussions. But understanding these laws has encouraged me to take action when necessary, knowing that my intentions are recognized.
Liability and Protection for Rescuers
It’s important to remember that while Good Samaritan Laws offer some protection, they can vary by state. I recommend familiarizing myself with the laws in my area, especially if I plan to be around children regularly. This knowledge not only empowers me to act but also eases any concerns I might have about liability. I believe that understanding these legalities is a crucial part of being prepared for emergencies. We can save lives without the fear of legal reprisal, knowing that acting quickly can be the difference between life and death.
Frequently Asked Questions
What is CPR?
Cardiopulmonary resuscitation, or CPR, is a lifesaving technique used when someone’s heart stops beating or they stop breathing. It is especially important for children due to their vulnerability to sudden cardiac arrest and respiratory problems.
Why is CPR important for children?
Performing CPR on children is crucial because they are more vulnerable to sudden cardiac arrest and respiratory problems. Prompt initiation of CPR can significantly increase the chances of survival.
What are the key differences between adult and child CPR?
Key differences include using one hand for chest compressions instead of two, adjusting the depth and rate of compressions according to the child’s smaller body, and providing rescue breaths more gently to avoid harming their lungs.
How can I recognize cardiac arrest in children?
Signs of cardiac arrest in children include unresponsiveness, lack of breathing, or abnormal breathing. If a child is not responding to voice or touch, it is essential to act quickly.
What should I do before performing CPR?
Before performing CPR, it is vital to ensure that the scene is safe. Look for potential hazards, and make sure you can safely approach the child before taking action.
What is the first step in administering CPR?
The first step is to check the child’s responsiveness by gently shaking their shoulders and calling out their name. If there is no response, you should call for help immediately.
What is the recommended compression depth and rate for child CPR?
The recommended compression rate for child CPR is about 100 to 120 compressions per minute, with a compression depth of about one-third of the chest’s depth, using one hand for compressions.
How should rescue breaths be administered to a child?
Rescue breaths should be given gently, covering the child’s mouth with your own to ensure a good seal. Each breath should be given over one second, watching for the chest to rise without over-inflating the lungs.
What should I do after CPR is administered?
After CPR is administered, remain calm and provide clear information to emergency responders about the child’s condition and the actions taken. Monitor the child’s breathing and responsiveness until help arrives.
Where can I get CPR training?
CPR training can be obtained from reputable organizations like the American Heart Association or the Red Cross, as well as local community centers and hospitals that offer CPR training sessions.